Unleash Your Smile with Customizable Tooth Jewelry
Have you ever looked in the mirror and thought your smile could use a little something extra? Whether you’re drawn to subtle sparkle or bold statement pieces, your teeth can become a canvas for self-expression just like any other part of your style. Enter tooth gems — tiny, dazzling accessories that are taking the world of dental fashion by storm.
So, what is a tooth gem exactly? It’s a small decorative crystal, stone, or charm bonded to the surface of your tooth using dental-safe adhesive. No drilling, no permanent alterations — just a fun, reversible way to add some shine to your smile. From celebrities to everyday trendsetters, people everywhere are embracing this accessible form of personal expression.
If you’re new to the world of tooth jewelry, you’re in the right place. This guide is designed specifically for beginners who want to explore customizable tooth jewelry without feeling overwhelmed. We’ll walk you through everything — from choosing the right tooth gem kit, to applying your gem safely, to keeping it looking its best. By the end, you’ll have all the confidence you need to let your smile truly sparkle.
What is a Tooth Gem? Defining Your Dental Accessory
A tooth gem is a small decorative ornament — typically a crystal, rhinestone, or genuine gemstone — bonded directly to the enamel surface of a tooth using dental-safe adhesive. The process requires no drilling, no enamel removal, and leaves your tooth completely intact when the gem is eventually removed. Think of it as jewelry for your smile, as wearable and reversible as a pair of earrings.
Tooth gems actually trace their roots back to ancient civilizations, where decorative dental modifications symbolized status and beauty. Today, they’ve evolved into a mainstream fashion trend embraced by celebrities, influencers, and everyday style enthusiasts alike. Modern options range from simple clear crystals and colorful stones to lab-grown diamonds and gold-plated charms. Placement is equally flexible — most people choose a front tooth for maximum visibility, but gems can be positioned anywhere that suits your aesthetic. For beginners, the appeal is clear: it’s an easy, low-commitment way to experiment with a bold new look without any permanent consequences.
Customizable Tooth Jewelry: Express Your Unique Style
One of the most exciting aspects of tooth jewelry is how deeply personal it can be. Whether you gravitate toward minimalist elegance or eye-catching drama, there’s a combination of shape, color, size, and material to match your vision. Clear and white crystals remain perennial favorites for their versatility, but colored stones — sapphire blue, emerald green, ruby red — let you coordinate your smile with your mood or outfit. Shapes extend beyond classic round cuts to stars, hearts, moons, and even custom initials, giving every wearer a genuinely unique result.
Material choice adds another dimension to customization. Swarovski crystals deliver brilliant sparkle at an accessible level, while lab-grown diamonds and genuine gemstones offer a more luxurious feel. Gold and silver foil-backed gems create a metallic accent that photographs beautifully. Current trends lean toward constellation-style clusters — two or three small gems placed together — and mixing warm and cool tones for contrast. Many style enthusiasts who layer their looks with press-on nails and temporary tattoos from brands like Never Have I Ever find that tooth gems complete the picture, adding a finishing touch that ties a head-to-toe aesthetic together. The good news for DIY enthusiasts is that most tooth gem kits now include a curated selection of stones, shapes, and colors, so you can experiment freely and swap styles as your taste evolves without committing to a single look.
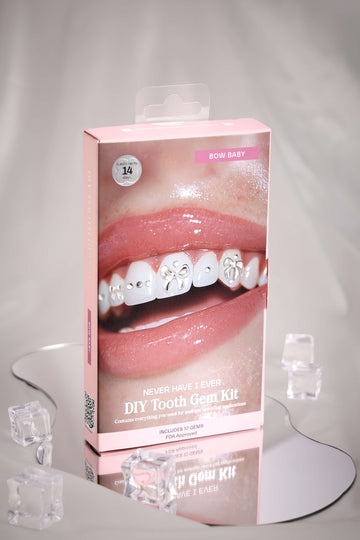
Tooth Gem Kits: Your All-in-One Beginner’s Solution
If you’re just starting out, a tooth gem kit is the smartest way to dive in. Rather than sourcing individual components separately — and risking incompatible materials — a quality kit bundles everything you need into one beginner-friendly package. Most kits include an assortment of gems in different sizes and shapes, dental-safe adhesive (typically a light-cure or self-cure formula), a gem applicator or tweezers, an etching gel to prepare the tooth surface, and step-by-step instructions. Some premium kits also include a UV or LED curing light, cotton rolls, and a tooth-polishing tool for professional-level results at home.

Choosing the right kit matters more than most beginners expect. Look for kits that explicitly state they use dental-grade, non-toxic adhesive — this is non-negotiable for safety. Check whether the gems are made from body-safe materials like Swarovski crystals or medical-grade rhinestones, and avoid kits with vague ingredient lists. Reading verified user reviews can reveal a lot about ease of use and actual adhesion quality.
Ease of application should also factor into your decision. Kits designed for beginners typically include detailed visual instructions and pre-measured adhesive portions, which reduce the guesswork significantly. If you have any known dental sensitivities or existing dental work like veneers or crowns, consult your dentist before applying any adhesive product. A well-chosen kit transforms what might seem like a complicated process into a straightforward, enjoyable experience — and sets you up for a result you’ll actually be proud to show off.
Step-by-Step Instructions for Applying Tooth Gems
Preparation: Gathering Your Tools and Ensuring Safety
Before anything touches your tooth, lay out every component from your kit — gems, adhesive, applicator, etching gel, cotton rolls, and curing light if included. Check the ingredient list for any known allergens, and do a quick patch test if your skin tends to be sensitive. Brush and floss thoroughly so you’re starting with a completely clean mouth.
Cleaning and Drying: The Foundation for Adhesion
Moisture is the enemy of a lasting bond. After brushing, use a cotton roll to isolate the target tooth and keep saliva away. Dry the enamel surface completely with a gentle stream of air or a clean cotton swab. Apply the etching gel provided in your kit for the recommended time — usually 15 to 30 seconds — then rinse and dry again. This micro-roughening step is what allows the adhesive to grip properly, so don’t skip it.
Applying Adhesive and Placing the Gem
Apply a tiny, controlled dot of dental-grade adhesive directly onto the back of the gem using your applicator — not onto the tooth itself. This gives you better placement control. Press the gem firmly against the center of your chosen spot and hold it steady for 10 to 20 seconds. Use a mirror to confirm alignment before the adhesive sets. If the gem shifts, reposition it immediately rather than waiting.
Curing and Final Checks
If your kit includes a UV or LED curing light, hold it directly over the gem for the specified duration, typically 30 to 60 seconds, to harden the adhesive fully. Once cured, gently tap the gem with your fingernail — it should feel completely solid with zero movement. Avoid eating or drinking for at least one hour afterward to let the bond reach full strength.
Understanding the Longevity and Care of Tooth Gems
With proper application and maintenance, a tooth gem typically lasts anywhere from two months to a year. Longevity depends on several factors: the quality of your adhesive, how thoroughly you prepared the tooth surface, your diet, and your daily oral habits. Gems placed on teeth that experience heavy biting pressure tend to dislodge sooner, which is why front teeth remain the most practical placement choice for extended wear.
Caring for your gem doesn’t require a complicated routine — just a few mindful adjustments. Brush gently around the gem using a soft-bristled toothbrush, angling the bristles to clean beneath and beside it without snagging. Avoid biting directly into hard foods like ice, hard candy, or crusty bread, as the impact can pop the gem loose. Sticky foods like caramel or chewing gum are equally problematic and worth avoiding. Rinsing with an alcohol-free mouthwash keeps the area clean without weakening the adhesive bond over time.
If your gem starts to feel loose or shifts noticeably, resist the urge to pull it off yourself — you risk scratching the enamel. Instead, visit your dentist for safe removal. Professional removal is quick, painless, and leaves your tooth surface completely unharmed. Regular dental check-ups are also a good opportunity to have your dentist inspect the gem’s condition and confirm your enamel remains healthy underneath.
Tooth Gems FAQ: Answering Common Questions
Are tooth gems safe? Yes — when applied with dental-grade adhesive and body-safe materials, they pose no harm to enamel. Do they hurt? Not at all; the process is entirely painless with no drilling involved. How long do they last? Typically two months to a year, depending on placement and care. Can you get one over a veneer or crown? It’s possible, but consult your dentist first, as adhesion behaves differently on artificial surfaces. Will removing a gem damage your tooth? No — professional removal leaves enamel completely intact.
Start Your Tooth Gem Journey with Confidence
Tooth gems have transformed from an ancient cultural practice into one of the most accessible and exciting ways to personalize your smile today. As you’ve seen throughout this guide, the journey from curious beginner to confident gem wearer is far simpler than it might initially seem. With the right tooth gem kit, a little preparation, and some basic aftercare habits, you can achieve a result that looks polished, feels comfortable, and reflects exactly who you are.
The beauty of customizable tooth jewelry lies in its flexibility. You’re not locked into a single style — you can experiment with different shapes, colors, and placements as your taste evolves, swapping looks as freely as you change your accessories. Whether you opt for a single understated crystal or a bold constellation cluster, your smile becomes a genuine extension of your personal style.
Ready to take the plunge? Start by browsing tooth gem kits designed for beginners, pick a style that excites you, and follow the step-by-step application process outlined here. Your most dazzling smile is closer than you think — all it needs is a little sparkle to truly shine.